In December 2018, Salesforce announced a new frontend developer paradigm: Lightning Web Components. But¦wait a minute! Didn’t they announce Lightning Components in 2016, the new frontend framework, and VisualForce finally retired?
Haha, sure, but this is Lightning WEB Components! Here’s the situation: Now we have on Salesforce frontend 3 frameworks:
- VisualForce
- Lighting Components (which if officially called now Aura Components)
- Lightning Web Components
Confusing? Yes, it could be, but read further, and you will see, why I’m so excited about the new framework.
Aura Components is a pretty good framework, but has had some very annoying problems. Now it’s mature enough (after 3 years) and working nicely. And the good news is: it’s not going away in the near future, so your Aura skills are not lost.
The even better news is: Lightning Web Components uses a similar, simplified and standardised paradigm; which makes available a lot of new JavaScript features! And the best thing is: you can use new Lightning Web Components in Aura Components (but not vice-versa!)
My bet is that Salesforce slowly will abandon the Aura framework, so I think it’s a very good time to get familiar with the new paradigm.
An example
The programming frameworks Hello World *example is probably the To-Do list; so let’s code it!
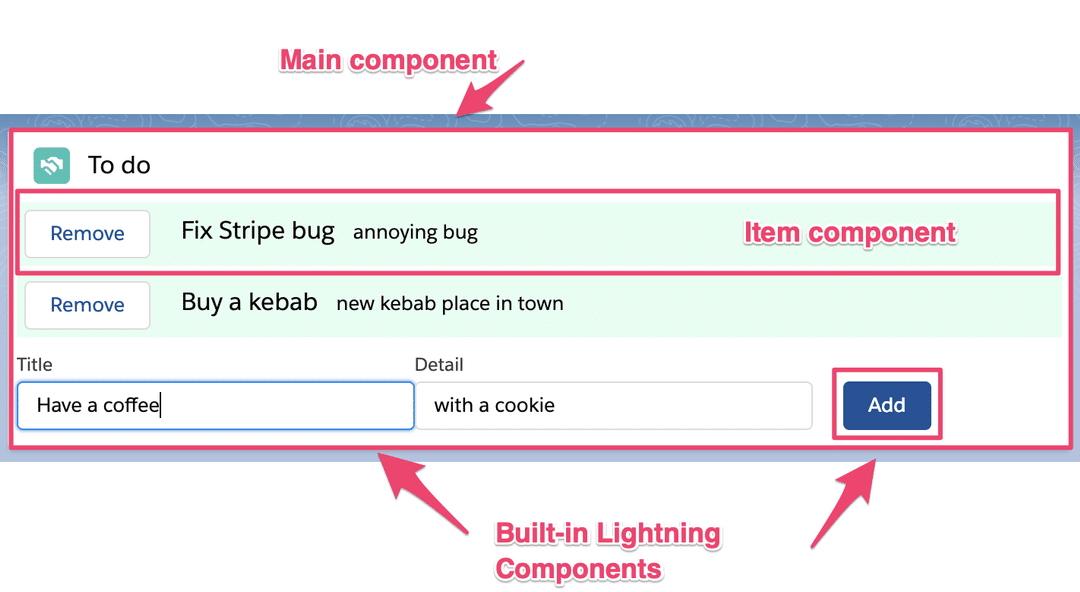
So far this is very similar: A parent component, composed of a couple of child components. Some child components are available from Salesforce (they are the same as in the Aura framework), and some of them are custom-built. Note that the Item component is a list! This is also well-known from Aura.
Html templates
<template></template>
<lightning-card title=”To do” icon-name=”custom:custom14″></lightning-card>
<template for:each=”{list}” for:item=”item”></template>
key={item.key}
number={item.number}
title={item.title}
detail={item.detail}
ondelitem={onDelitem}>
<div class=”slds-grid to-do”></div>
<div class=”slds-col”></div>
<lightning-input label=”Title” value=”{titleInput}” onchange=”{onTitleInputChange}”></lightning-input>
<div class=”slds-col”></div>
<lightning-input label=”Detail” value=”{detailInput}” onchange=”{onDetailInputChange}”></lightning-input>
<div class=”slds-col add-button”></div>
<lightning-button variant=”brand” label=”Add” onclick=”{onItemSubmit}”></lightning-button>
The template looks very similar to Aura templates.
- Data bindings: instead of {!v.data}, you simply use {data}
- Controller actions: instead of {!c.action}, you use {action}
- Pre-build components, such as buttons, are available: <lighning-button> instead of <lighting:button></lighting:button></lighning-button>
- Your own components: instead
Your task: figure out how the new framework deals with a list!
Hint: look for the keyword for each
Maybe you noticed that we don’t need to declare our variables in the template. Instead, we declare them in the javascript file.
The javascript file
import { LightningElement, track } from ‘lwc’;
export default class ToDoList extends LightningElement {
@track titleInput = ‘Have a coffee’;
@track detailInput = ‘With a cookie’;
@track _list = [
{title : ‘Fix Stripe bug’, detail : ‘annoying bug’},
{title : ‘Buy a kebab’, detail : ‘new kebab place in town’}
];
get list() {
return this._list.map((el, i) => {
el.number = i;
return el;
});
}
onItemSubmit() {
this._list.push({title : this.titleInput, detail : this.detailInput});
this.titleInput = ”;
this.detailInput = ”;
}
onTitleInputChange(event) {
this.titleInput = event.target.value;
}
onDetailInputChange(event) {
this.detailInput = event.target.value;
}
onDelitem(event) {
this._list = this._list.filter((el, i) => {return i !== event.detail;});
}
}
In the new framework we don™t have a controller and a helper, only one javascript file (it fact, if we have a lot of code, we can create other .js files too, and import them. This is really cool!)
Let’s see:
- Import the framework. You first import the framework and create a class which is the backbone of your component. Once the component is on the page, an instance of this class is created. The state of your component (variables, events, etc) is in this class instance.
- Properties. The class has properties, such as titleInput .These properties are available in the html, so you can bind them.
- Methods (functions). The same way as you fired methods on events in Aura, you also can fire them now. For example, on onclick action of the ˜Add™ button the onItemSubmit method is fired. Note that these methods have access to the class properties using the .this reference ” this is just the standard OO way!
- Getters/Setters. You can also bind methods to the html; these special methods (starting with get) return some value, which is created dynamically. Look into the list() getter: it maps a number property to the elements of _list property.
The events
Events are also much simplified in the new paradigm. In the old paradigm, we declared events on the beginning of the template which we are listening to. In the new paradigm, we bind methods to events on the component html; no declaration needed!
<c-todo-item ondelitem=”{onDelitem}”></c-todo-item>
So, to the delitem event we bind the onDelitem js method. The cool thing is that this works as the standard browser events: think about onclick, onblur, etc. But now you can create your own browser events, too. (the naming convention is : on+{event-name}; so: onclick, ondelitem¦.)
Firing an event
This is the <c-todo-item> component html and javascript:</c-todo-item>
<template></template>
<div class=”my-card”></div>
<span></span>
<lightning-button label=”Remove” onclick=”{deleteItem}”></lightning-button>
<span class=”slds-text-heading_small my-title”>{title}</span>
<span class=”slds-p-horizontal_small”>{detail}</span>
import { LightningElement, api } from ‘lwc’;
export default class TodoItem extends LightningElement {
@api title;
@api detail;
@api number;
deleteItem(event) {
this.dispatchEvent(new CustomEvent(‘delitem’, {detail : this.number}));
}
}
As you can see, when the user clicks the ˜Remove™ button, the deleteItem methods is fired. It creates and dispatches an event called delitem.
And this is it! As you remember, the parent component listens to this event, so when it catches it, the corresponding method on the parent component javascript is fired. Ready!
Your task: figure out, what happens next, how the item is removed from the list?
Hint: what the onDelitem method does with the list_ property? How the html template gets the list_ property?
Conclusion
I think the Lightning Web Component paradigm makes life much more simple as it needs less boilerplate code. Also, as it uses a standardised javascript approach, it is much more liberal about your programming style.
In the next post I’ll study further the framework till then, don’t forget to check out the Official Lightning Web Component Playground.
